How to landscape around a mailbox without blocking delivery
Get practical ideas for mailbox landscaping that add curb appeal while following USPS rules for height, setback and clear delivery access.
 Reported by Isaiah Jernigan
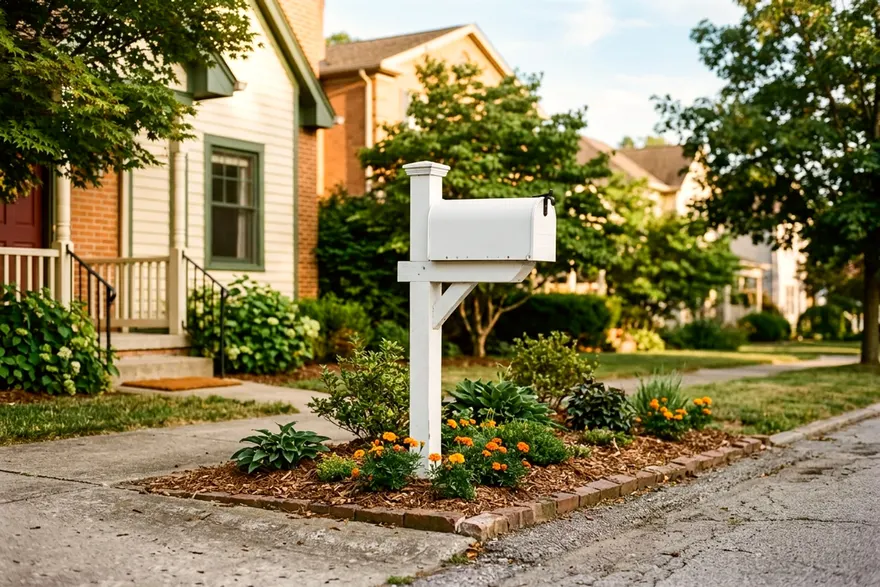
Planting a small bed around your curbside mailbox adds charm to the street edge of your yard. The trick is choosing plants and borders that frame the post without blocking the mail carrier. A solid layout keeps the space tidy and makes daily delivery easy.
Check the USPS height and setback before you plant
April brings warm weather and the urge to dig near the street. Before breaking ground, verify your mailbox sits at the right height and distance, because a leaning post throws off the look of your new garden bed. Grab a tape measure and check the dimensions. A May 2016 USPS Postal Bulletin says curbside mailboxes are generally set 41 to 45 inches from the road surface to the bottom of the box or point of mail entry.
The door needs space to drop open completely. If the post leans forward, the door might hit the curb or sit too close to the truck. The same USPS bulletin says the mailbox door is generally set back 6 to 8 inches from the front face of the curb or road edge, though local rules can vary, so check with your post office.
A wobbly wooden post needs firm footing, but ask your local post office what support suits your road before you pour concrete around it. Use a level on two adjacent sides of the post to ensure it stands straight.
Brick columns and heavy steel structures require a conversation with your local post office. A custom built curbside mailbox needs prior approval from the local postmaster, per the USPS bulletin. Rules can vary, so ask your local post office what it needs.
If you buy a standard approved metal box and attach it to a wooden post, the custom build approval rule does not apply, but USPS still advises contacting your local post office first. Existing posts that already meet the height and setback rules give you a fixed center for your garden bed. Leave the post where it stands unless your local post office says otherwise.
Call 811 before you dig, even for a small bed
Many homeowners assume utility lines are buried deep. Telephone cables and fiber optic lines can sit closer to the surface than you might expect. A shovel blade easily slices through a communication wire. Calling 811 before digging is free, and having the underground lines marked costs you nothing, according to the federal pipeline safety agency PHMSA.
PHMSA says state laws require a call 48 to 72 hours before digging, and even small jobs such as planting trees or shrubs need one. Preparing for the locate service takes only a few minutes.
- Mark the outline of your planned garden bed with white spray paint.
- Call 811 and provide your street address and nearest cross street.
- Wait for the utility companies to send technicians to your yard.
- Note the colors of the flags they leave behind, since flag colors usually show which utility owns a line.
Paint marks or small flags will appear on your grass to show where lines run. Plan the shape of your bed to avoid these marks. Dig by hand with care near marked lines, and check your state's rules for how close you may dig. Wait for the utility workers to clear the area before you push a shovel into the soil.
Keep the front of the box clear for the carrier
Many carriers deliver from the driver seat of a truck. They pull up close to the curb and reach out the window to pull down the mailbox door. Any plant that brushes against the truck or blocks the door makes their job harder. Leave a wide gap directly below and in front of the mailbox opening.
Winter snow brings another reason to keep the front clear. Snowplows push heavy slush against the curb. A clear space directly under the box gives the plow room to pass without crushing your plants. You also need a flat space to shovel the snow away from the mail slot.
Keep the flag side clear, as the raised flag signals the carrier to stop and collect an outgoing letter. Tall ornamental grasses swaying in the breeze easily hide the flag from view. Prune back any stems that grow close to the box sides. Keep vines off the door and the flag entirely, because wrapped vines look attractive but quickly cover the hinges.
Bees and wasps love flowering plants, and carriers want to avoid getting stung while reaching for the mail. Pick plain foliage plants like hostas or ferns instead of heavy bloomers for the side facing the street. Save the bright flowers for the back of the bed.
Pick low plants for the front and taller ones behind
Good ideas for mailbox landscaping start with a tiered approach. Use groundcovers near the street and save the taller shrubs for the side facing the house. This layout gives you depth while keeping the mail slot visible from the road. It also links the roadside strip to the other ways to improve curb appeal across your front lawn.
Divide your garden bed into three simple zones, starting with a front zone that touches the curb. Low creeping plants like creeping thyme and sweet alyssum belong in this front zone. They handle the dry heat radiating off the asphalt on a summer afternoon. Their low profile means the carrier never brushes against them.
The middle zone flanks the wooden post, making a great space for mid-sized plants. Dwarf daylilies provide tough foliage that bounces back if a stray tire bumps it. Coreopsis and trailing rosemary may also do well here, depending on your climate. Leave a wide ring of bare soil between the plant base and the wooden post to prevent rot.
The back zone supports the tallest plants. A compact hydrangea or a dwarf evergreen anchors the bed and hides the bare back of the metal box. Choose a short variety that stops growing below the mailbox line. This height limit helps keep the foliage from drooping over the top.
Keep thorny plants far away from the street. Roses and barberry belong closer to your porch.
Edge and mulch the bed so mowing is easy
Grass roots are aggressive and will invade your soft garden soil, so a physical barrier stops the lawn from creeping in. Concrete scalloped edging drops easily into a shallow trench. Cobblestones offer a classic look that matches a brick house. Heavy plastic border edging works if you bury it deep enough to stay rigid.
Whichever material you choose, set it low. A border that sits slightly above the dirt holds the mulch but lets the mower deck pass over easily. This setup means you spend less time trimming the grass with a string trimmer. A flat border gives your lawnmower wheels a clear path to follow.
Fill the bare soil around your plants with a thick layer of mulch. Bark mulch helps the soil hold moisture during hot summer weeks and keeps weeds from taking root in the open dirt. Pine straw works well in southern states and is often cheap. Spread the mulch evenly across the exposed soil.
Pull the mulch away from the actual post. A thick pile of damp wood chips resting against a wooden post speeds up decay. Leave a small gap of bare dirt right at the base. If you spot small holes in your yard near the post, chipmunks or voles might be hunting for insects under the fresh mulch.
Heavy rain easily washes lightweight wood chips down the driveway curb and into the street. Choose a dense shredded bark that mats together over time. This keeps your hard work from washing away during a heavy storm.
Add house numbers the carrier and visitors can read
Your mailbox acts as the primary signpost for your house. Delivery drivers and emergency responders look for those numbers first. Faded or peeling stickers make your house hard to locate after dark.
USPS says house numbers on a mailbox should be in a contrasting color and at least 1 inch tall. Finding numbers that meet this rule takes one trip to the hardware store. Solid black numbers stand out sharply against a white box. Reflective silver numbers catch headlights at night and work perfectly on a black metal box.
Position the numbers on the side of the box where the approaching carrier can see them, or on both sides if traffic comes from two directions. Some homeowners place the numbers vertically on the wooden post. This works only if your plants never cover the wood. Placing them directly on the metal box helps keep them visible year round.
Clean the metal with rubbing alcohol and a rag before applying peel and stick numbers. The alcohol removes dust and grease so the adhesive grabs tight. Cold weather makes adhesives stiff. Wait for a dry, warm afternoon to apply them.
An HOA sometimes enforces strict rules about mailbox colors and fonts. Read the guidelines before buying new numbers. Follow the local standard to avoid a warning letter, but ensure the final result meets the basic postal requirements for size and contrast.
More from down the street
11 front walkway ideas that lead guests to your door
Find the right front walkway ideas to guide guests to your front door with path shapes, edging, border plants and paving materials.
Should you put a fence in your front yard
A front yard fence gives your house a clear boundary and adds curb appeal, but you need to check local height rules and HOA covenants before you build.
9 planting ideas for the bed in front of your porch
Get clear ideas for front porch landscaping that frame your house. Learn how to space plants, layer heights and pick shrubs for year-round color.