How to set up a garage workbench that fits your projects
Set up a garage workbench that fits your space and projects with the right dimensions, a tough work surface, bright lighting and safe power access.
 Reported by Jolene Imhoff
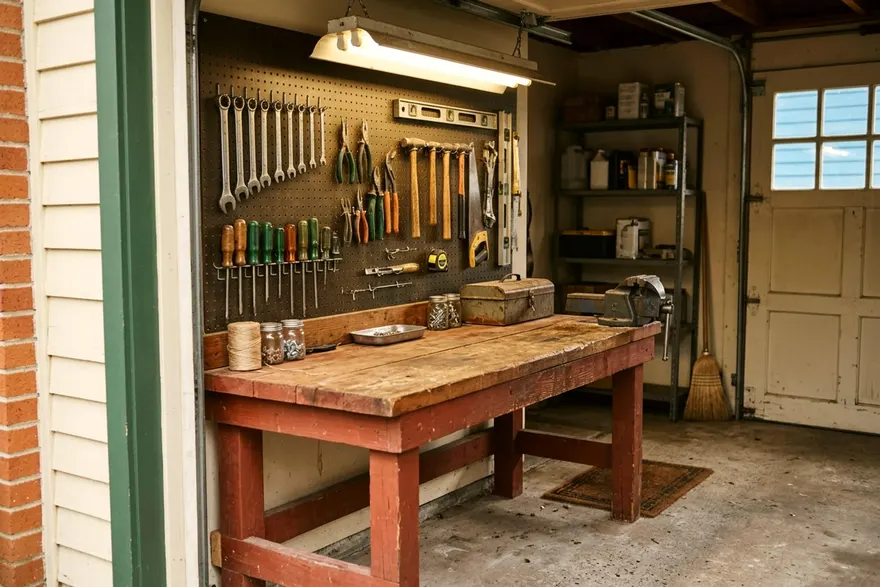
A useful garage workbench gives you a dedicated surface for repairs and building projects. Setting up the right area means picking a sturdy bench and bringing safe power to your tools. You can buy a steel framed unit or build a custom frame from rough lumber. A Saturday spent organizing this space makes future home repairs much easier.
Find the right wall and pick a size
Garage walls usually dictate where a workbench can go. The back wall often offers the most depth. Side walls work well if your car leaves enough room to open the doors.
Measuring the space with the car parked inside prevents tight squeezes later. You need enough room to stand and move material around.
A good bench depth lets you reach tools on the wall without leaning too far. A surface that runs too deep makes the back wall useless.
Building a top from standard plywood works well. A full sheet cuts exactly in half to make a thick double layer.
Width depends entirely on your open wall space. A long bench gives you room to leave a miter saw at one end while working at the other. Planning for a heavy bench means checking the floor.
Garage floors often slope toward the driveway to shed water. A fixed bench needs shims under the front legs to keep the work surface level. Many people look for garage storage solutions before choosing a bench size. Getting the clutter out of the way reveals exactly how much wall space you really have.
Set the height to how you work
Workbench height determines how your back feels after a long project. Factory benches often match standard kitchen counters. This height works well for heavy downward tasks. Pushing a hand plane or sanding rough wood requires your body weight.
Standing work requires a different height. Assembly and detailed repairs feel better on a taller surface. A higher bench keeps you from hunching over. Finding your ideal standing height takes no special tools.
Put on your regular work shoes and stand straight. Let your arms hang loose at your sides. The distance from the floor to your wrist crease gives you a solid starting point. This can help your back.
Sitting down changes the setup entirely. A stool requires knee clearance under the bench top. Building a low bench suits electronics repair or small craft projects.
Most homeowners prefer a standing bench paired with a tall bar stool. You can sit for delicate work and push the stool aside to stand for heavy cuts.
Choose a top surface that takes a beating
Bench tops absorb hammer blows and spilled paint. The material you pick needs to survive daily abuse. Pine framing lumber makes a strong base. The top layer requires something flat and smooth.
Plywood remains the most popular choice. Two layers of thick plywood glued and screwed together create a massive slab. Spreading a thick layer of wood glue between the sheets makes them act as a single piece of wood.
Heavy pounding will not bounce on a thick plywood top. Sanded pine plywood looks clean and takes a polyurethane finish well. Sealing the wood stops oil and wood glue from soaking into the grain.
Medium density fiberboard offers an incredibly flat surface. Factory benches often use this material. Fiberboard chips easily at the edges and swells if it gets wet. Using fiberboard requires sealing the edges thoroughly.
Adding a sacrificial top layer protects your investment. A thin sheet of hardboard costs very little.
Cut the hardboard to fit and attach it with countersunk screws. The hardboard takes all the scratches and glue drips. You simply unscrew it and install a fresh piece when it gets too messy.
Solid butcher block makes a beautiful and rigid top. Maple or oak blocks hold heavy cast iron vises well. Steel tops handle welding and wipe clean after messy engine work.
Both options usually cost more than common wood.
Add storage under, above and beside the bench
Tools left on the bench get in the way of your project. The wall above the bench provides perfect storage for hand tools. Pegboard panels keep hammers and screwdrivers visible. A sheet of pegboard needs a wooden frame behind it.
Wood strips hold the board off the drywall. This gap allows the metal hooks to slide in. Plastic zip ties can secure the hooks so they stay put when you grab a tool.
French cleats offer a stronger wall storage method. A wooden board cut lengthwise at an angle attaches to the wall studs. You attach the matching angle to the back of small cabinets.
The cabinets hang securely on the wall cleat. You can slide them left or right as your needs change. Learning to choose good garage cabinets keeps the whole room tidy.
Storage below the bench handles heavy equipment. Circular saws and routers belong on sturdy shelves. Building a bottom shelf off the floor keeps tools away from damp concrete.
Leaving the space under the bench open allows a rolling tool chest to slide underneath. This setup saves floor space while holding hundreds of small hand tools.
Clear plastic bins sort out the hardware. A row of small bins on a shelf above the pegboard holds loose screws and nails. Labeling the front of each bin saves time.
Finding a specific wood screw should take only a few moments. Stop digging through messy coffee cans.
Hang bright task lighting over the top
Standard garage lighting rarely reaches the corners. A single bulb on the ceiling casts a shadow over your hands when you stand at a wall. Good task lighting helps you see what you are doing.
LED shop lights provide bright light for modest power. A long LED fixture matches the length of a typical work area. Hanging the light directly above the front edge of the bench works best. The light shines straight down on your hands.
Mounting the fixture high above the bench top spreads the light evenly. Fixtures with chains allow you to adjust the height later. Look for daylight color bulbs. White light mimics bright daylight and makes pencil marks on wood much easier to see.
Dust settles heavily in a work area. Shop lights with smooth plastic covers wipe clean easily. Bare LED strips can collect sawdust and lose their brightness.
Plug-in fixtures avoid the need for complicated wiring. You can attach a switch to the front leg of the bench to control the overhead light.
Set up charging stations and outlets safely
Power tools require a reliable power source. Many garages have few outlets.
Running an extension cord across the floor creates a tripping hazard. Check each tool's manual for cord guidance.
Battery chargers need care in a garage. The US Fire Administration says to plug only one charging appliance into an outlet in the garage.
Stacking multiple chargers on one outlet goes against that advice. The US Fire Administration says not to use an extension cord when charging an appliance. Plug chargers straight into a wall outlet.
A dedicated electrical circuit can solve many power problems. Heavy tools like table saws need substantial power, so check the tool's label. A garage sharing a circuit with other outlets can trip the breaker.
Call a professional. A licensed electrician can pull a new electrical circuit specifically for the wall behind your bench.
Placing outlets high off the floor puts them above the bench top. You can plug in a sander without reaching under the table. Multiple separate receptacles spaced along the wall give you room to plug in tools safely.
Keep a clear floor in front of the bench
Floor space dictates how useful the bench becomes. A beautiful work area fails if you cannot stand comfortably in front of it. Parked cars push people against the wall. Try to leave plenty of clear floor between the bench and a parked car.
Moving large pieces of wood requires swing room. Pushing a long board through a router needs space on both sides. A cramped layout forces you to cut wood on the driveway instead.
Setting up your garage makes a great first year home project.
Hard concrete floors can be tiring to stand on for an afternoon. Anti-fatigue mats provide a thick rubber cushion.
Mats with beveled edges reduce the chance of tripping. Choose a mat made from solid rubber rather than foam. Rubber tends to hold up better to dropped tools. It lasts much longer.
Sawdust on smooth concrete can be slippery. A slippery floor near power tools invites accidents. Keep a stiff push broom next to the bench. A dedicated shop vacuum picks up the fine dust that a broom misses.
Keep a heavy duty trash can beside the bench. Throwing away wood scraps immediately keeps them off the floor. Sweeping up immediately keeps the whole room clean.
More from down the street
9 things not to store in your garage and where they belong
Find nine things in a garage you should never store there to protect your house from fire and pests, along with exact steps to safely move or discard them.
How to choose garage storage cabinets that last
Find the right garage storage cabinets to organize your tools and gear. Learn how to measure your space, choose materials and anchor heavy duty units safely.
14 garage organization ideas that fit the car back in
Get your parking spot back with these practical garage organization ideas that help you clear the floor, sort your tools and claim the space.